Sunday 21 August 2011

Kathy's New Pillows

So I know I'm not the first to make pillows from vintage clothing, but its so easy and inexpensive and a great way to get custom on the cheap.  Ikea sells pillow inserts for around $5,  or you can reuse pillows you already have but just want a new look.  I just picked out clothess that I liked the colours and textures.  I didn't get fancy and add zippers, but you could.  And if you aren't a sewer I'm sure you could take it to a tailor and they'd sew it up.  I made theses for Kathy's new condo:


The white one is backed in the light purple.  It is made of sweaters.  The grey was a tweed skirt and the turquoise and floral were both pleated skirts.  I cut the hem of the turquoise to make the ruffle on the grey.


The cardigan pillow is the only removable cover since I left the light purple unsewn on one side.  Just remember shop the L-XL sections to get enough material to work with.


I also painted her a coffee table found at a thrift shop.  I used a $5 sample paint from a big box store and coated it with poly to protect it.  Accessorizing to come this fall,  like it or not Kathy....


Friday 19 August 2011

Bathroom Mini Reno Teaser

So like many rooms in the house we are decorating on a budget, meaning lots of them are works in progress.  I've ordered new a floor for the bathroom to be replaced soon and I've got some ideas on how to spruce it up, but I want to start with the before and current and I'll post the after later.

Before:


Its really not showing in this picture, but the walls were sponge painted in mauve. My fiancee laughed at me when he realized I was happy after we had only primed it.


Current:


Painting Glass

So I discovered this a while back.  It seems to be a re-occurring theme of me pulling stuff from the garbage, but when you see free stuff that you like, you take it.

My old apartment was replacing the windows, so I found one of the old ones out back, on another occasion I found the following picture frame.  I decided to paint the glass.  I used basic Acrylic paints and dobbed it on the back side of the window glass.

Like so:


Then you just flip it around.  it gives you a great finished look since you get the shine of the glass panes.


A few years later I dug out the same paints to paint the back of the glass on this frame.  I also painted the frame white and distressed it.  You just need to glue the glass into the frame by piping hot glue around all the edges.  Both now live happily in my kitchen.


Oh and in case you are wondering....yes that is a woven blind attached to a bookcase.  It is serving us well as a makeshift pantry.

Thursday 18 August 2011

Countdown to wedding!

So I've force-ably offered my sister some DIY services for her wedding.  Consulting the Ruffled website  was a huge source of inspiration.  The following are beginnings of ribbon flowers, search rick rack bouquet for some instructions.  The hair pieces I made with feathers from a craft store and a hot glue gun.  Really there is no reason why these should cost more than $20.


Saturday 13 August 2011

Fixing a fathers day gift

So  a while back my man got the idea to get a vintage first aid kit for the front hallway to store keys.  I thought perfect fathers day gift.  After dealing with someone really annoying on Etsy, I ended up settling on one that I didn't think was so great.  I was right, he didn't like it, it wasn't even vintage.  Oops.  So I decided to try and revive it.  I forgot to take a before picture, but it looked much like the following:

Before:


After:


I spread paint stripper all over, let it set and scrubbed away.  I had to use Brasso to scrub off all the rust.  I bought cheapo stencils from staples and used old paint, then a gloss protector.

Sunday 7 August 2011

Study and Guest Room

Its always nice to figure out how to make the last bedroom something more than just a bedroom.  The previous owners used the second bedroom as an office, nursery and kids play room....it was kind of scary.  We decided we did still want to be able to use this room as a study, but put the focus more on creating just a nice place to hang out and sleep if need be.  I think we are pretty happy with the result.

Before:


After:


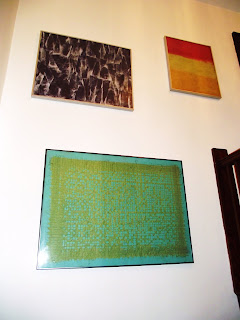
Pretty Papers

I think aside from finding art in the garbage (which is where I got on of these frames, hah!)  this is about the cheapest way to execute really great art.  All three of these images are fancy paper that I got from an art store.  Each of them were only $4.  The green one I mounted on a piece of cardboard that I painted teal.  I thought the red and yellow was very Rothko-esque.

Saturday 6 August 2011

New Ottoman

So we said goodbye to the bulky leather ottoman in favor of something with a bit more character and storage for our components since the computer is connect to the TV.  (if you haven't done this, you are missing out)  I decided I wanted a piano bench after googling Antique benches for days.

Before:


After:


We wanted to still be able to use it as a seat and for it to be comfy to put your feet up.  I attached a piece of particle board that I upholstered with vinyl. 

Baby Room

The previous owners had this room as a toddler room, and as with the rest of the house it had oodles of furniture in it.... See what we did.  Eventually when baby grows up this will probably be an office.

Before:


After:


Jewellery Picture


I made this from a picture frame I found on the side of the road.  The glass broke but I always loved the frame so I've been waiting to find a use for it.  I screwed in those mini metal hooks that you get at the hardware store, just under the top lip of the frame.  Then hung most of my necklaces.  Its great because you can still pull them off to wear them.

(most jewellery created by Carley Christie)

Tuesday 2 August 2011

Kitchen Mini Reno


Before....


After....

What did we do?

-All new appliances,
-installed dishwasher in back corner since we decided we didn't need a kitchen table and dining.
- new light fixtures.  Found these on home depot.ca for 50% off.  $40 each.
-new Island
-New floors!  Used Armstrong composite tiles.  All tiles cost about $200.


Nothing better than adding chalkboard paint to a kitchen...after painting out all the blue that was there, I actually like the blue counter now.  Removed doors and wallpapered inside upper cabinets too.  This kitchen is now a happy place for us.

New Living room


Before....


After...

What did we do?

Pretty much the same labour as the dining room...

-sourced both lamps from the grandparents basement.
- reupholstered the chair with Ikea fabric, can't tell but I tufted it myself.  Not fun, but better than the brown corduroy.
-made a custom TV unit in order to get clearance for the heat register and make room for computer beside.  used two expedit drawer units and stained and cut two Ikea shelves.  its not fancy....maybe we'll do a close up later.
-did fake leaded glass window with metallic fabric paint.
-painted out fireplace and took down giant mirror.


Wallpaper from Graham and Brown

New Dining Room

Before....Check out the sweet stereo atop the china hutch.  Let me be clear.  Before we moved in..


After....

What did we do?

-stripped wall paper
-changed light fixture, found on Kijiji from old school house.
-DIY shelf, got Home Depot to cut me a piece of knotty pine to fit my Ikea brackets.  custom length shelf, solid wood
-reupholstered grandma's chairs
- removed french doors (weren't original to the house)
- painted everywhere.

table from Morba, its aluminum!


 Sideboard from Benjamin Moore in the junction. 


Kathy's Condo Chairs


Before...  Thrift store.  Guy accidentally charged me for only one.  $8.00 for both.  Next time I'll pay more attention.  Not cool robbing thrift stores.


After....
Used Krylon Fusion spray paint.  it lets you skip the priming step.  Coating with clear gloss spray over top for extra shine.  Anthropology tea towels to reupholster.  They are kind of pricey but always come in great designs and still cheaper than proper upholstery fabric.

Baby Photos

I like this option for displaying photos or making your own art.  If your aren't familiar with gel transfers, they are super easy.  I took three different canvases , one traditional, one linen and one wooden.  You can also add colour if you want, I've coloured some in with paint or pencil crayons before.  They come out backwards, so watch for images with wording in them.  I wont explain the process, look up gel transfers online.